Last updated: November 17, 2026
Quick answer: in most cases, you can narrow a stuck three-way solenoid valve down in 2 checks—listen for a click, then decide between chemical clearing or disassembly. This guide on How to Unclog a Stuck Three-Way Solenoid Valve on an Espresso Machine explains how to diagnose a stuck valve, when to try descaling, and when to stop and service the part instead. If you want the shortest path, start with the click test, then compare the results against chemical clearing or disassembly.
Key takeaways
- Start with the click test. A working coil that clicks shifts the problem toward scale debris or a sticky plunger.
- Chemical clearing can work when mineral buildup is light and the valve still actuates.
- Disassembly is often the better fix when the plunger stays stuck, the discharge path is packed, or the valve still blocks after descaling.
- The drip tray discharge tube matters as much as the brass body, because a clog there can mimic a bad valve.
- Do not keep forcing detergent or acid through a dead coil. If the valve never actuates, cleaning fluid alone usually wastes time.
What is actually stuck?
A stuck three-way solenoid valve is usually one of three things: the solenoid coil is not energizing, the armature tube and valve plunger are gummed up with scale debris, or the exhaust path to the drip tray discharge tube is blocked. The most useful clue is whether you hear or feel a clean click when the brew switch is turned on and off.
That click matters because the coil only moves the plunger if it can magnetically pull the armature. If the coil is dead, the valve can stay shut even when the group head has full pump pressure behind it. If the coil is alive, the problem is often mechanical inside the brass valve body, not electrical.
This is why a simple “water not coming out of espresso group head” complaint needs 2 checks before any teardown. One check is electrical, using a digital multimeter and the machine’s own switching circuit. The other is mechanical, using the audible click test. Skipping those steps can send you into disassembly when the fault is only a bad wire, or into chemical flushing when the coil has already failed.
The distinction also changes the fix. A coil fault usually means replacing the electrical part or repairing the supply. A plunger jam means clearing mineral scale from the valve body. Those are not the same job, and mixing them up burns time.
For background on scale formation and water hardness, see the Specialty Coffee Association water standards and APWA’s guidance on hard water scale.
How do I test the solenoid coil first?
Test the solenoid coil first by listening for a click and then checking continuity or resistance with a digital multimeter. A coil that clicks usually means the electrical side is alive, even if the valve body is still blocked with scale debris.
Use this order:
- Turn the machine on and pull the brew switch or start a brew cycle. Listen close to the valve area for a sharp click. A healthy coil usually makes a fast, dry tap.
- If there is no click, switch the machine off and disconnect power before opening anything.
- Remove access panels only far enough to reach the coil terminals.
- Set the digital multimeter to the correct resistance range and check the coil according to the machine’s service manual.
- If the coil shows no useful reading or the wiring is open, stop thinking about cleaning the brass body and fix the electrical fault first.
The click test is useful because it separates an electrical failure from a mechanical blockage in under a minute. If the coil energizes, chemical clearing is worth a try. If it does not, acid in the valve body will not solve the main problem.
Do not force the issue by cycling the brew switch over and over while the valve is dead. That can mislead you into thinking the clog is worse than it is, when the plunger is simply not moving at all. For a person who is comfortable with panels and wiring, the right next step is electrical diagnosis, not more flushing. For a person who is not, this is the point to stop and get help.
Chemical clearing or disassembly?
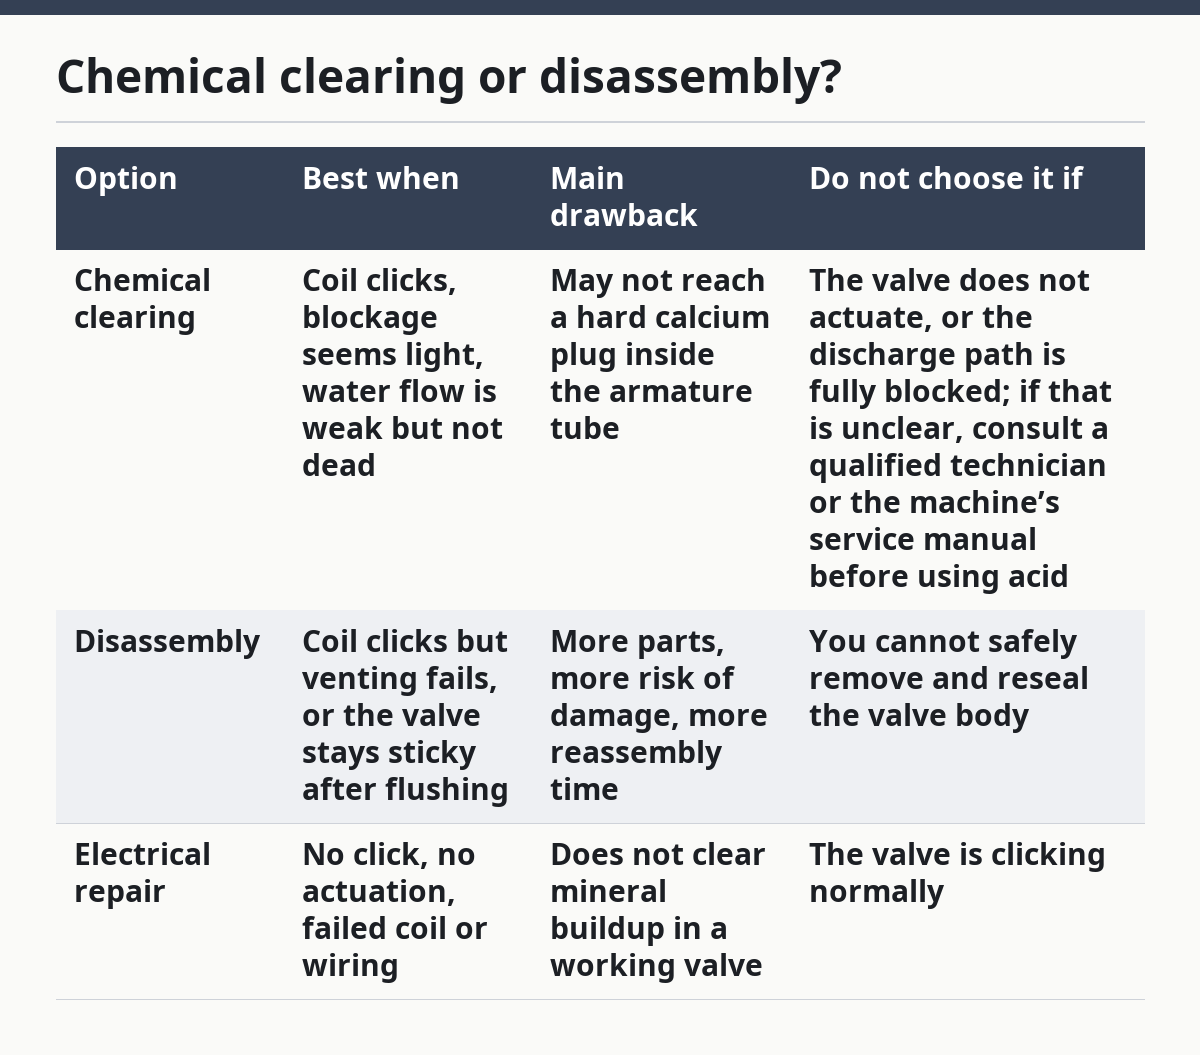
Chemical clearing is the faster first attempt when the valve clicks, while disassembly is often the better fix when the plunger is still stuck or the discharge path is packed with scale debris. The trade-off is simple: chemical clearing is less invasive but less certain; disassembly takes longer but reaches the stuck parts directly.
| Option | Best when | Main drawback | Do not choose it if |
|---|---|---|---|
| Chemical clearing | Coil clicks, blockage seems light, water flow is weak but not dead | May not reach a hard calcium plug inside the armature tube | The valve does not actuate, or the discharge path is fully blocked; if that is unclear, consult a qualified technician or the machine’s service manual before using acid |
| Disassembly | Coil clicks but venting fails, or the valve stays sticky after flushing | More parts, more risk of damage, more reassembly time | You cannot safely remove and reseal the valve body |
| Electrical repair | No click, no actuation, failed coil or wiring | Does not clear mineral buildup in a working valve | The valve is clicking normally |
Chemical clearing is best thought of as a controlled attempt to dissolve loose mineral buildup, not a cure-all. If the machine uses hard water and the valve has been neglected, calcium flakes can lodge where the plunger rides in the armature tube. In that case, the valve may click but not move cleanly.
Disassembly is the honest answer when the valve has a mechanical jam, but it is not the best choice for every reader. The brass body has to come apart so the plunger, spring, and bore can be inspected. That is the right move if the machine still refuses to vent pressure to the drip tray after a normal descale path.
This is also where generic advice goes wrong. Many guides treat every brew-side blockage as a scale problem, but that is only one possibility. Dead coils, bad connectors, and blocked exhaust tubes can produce the same symptom. A better diagnosis saves the part from needless acid and the owner from a pointless rebuild. For troubleshooting context, see how to tell if solenoid valve is stuck espresso and the machine’s own service documentation.
How do I clear a stuck three-way solenoid valve without taking it apart?
Clear a stuck three-way solenoid valve without taking it apart only if the coil clicks and the blockage looks like mineral buildup, not a dead plunger. The goal is to move descaling solution through the valve body long enough to soften scale debris, not to brute-force a jam.
A sensible approach is:
- Confirm the coil clicks during brew activation.
- Run the machine through the normal path for cleaning solution or descaling solution if the manufacturer allows it.
- Watch the drip tray discharge tube for any change in venting.
- Repeat the flush cycle only within the machine’s normal cleaning or descaling procedure, not as a long soak that can attack seals.
- Stop if there is no venting change after the normal cleaning cycle.
Chemical clearing works best when the plunger is only lightly stuck and the bore has soft mineral film. It is weaker against heavy calcium flakes that have packed into the valve seat or the armature tube. It is also the wrong move if the drip tray discharge tube is clogged downstream, because then the valve may be opening but nowhere for water to go.
The biggest mistake here is assuming more acid means more cleaning. It does not. More chemical can mean more seal wear, more loose debris, and more mess in the drain path. The smart cutoff is a simple one: if the valve clicks and the machine still will not vent after a normal cleaning pass, move on to disassembly.
This is the point where guidance from the machine’s service manual matters, and where a water quality guide from a group like the Specialty Coffee Association can help frame the scale problem. The root cause is often mineral content, but the fix still has to match the part that is actually stuck.
How do I disassemble and clear the plunger?
Disassemble and clear the plunger when the valve clicks but still will not exhaust pressure, because the stuck part is usually inside the brass valve body. The important parts are the armature tube, the valve plunger, the spring, and the small discharge path to the drip tray.
Follow the machine’s service manual, then work in a clear order:
- Turn power off and unplug the machine.
- Let the group cool enough to handle safely.
- Remove access panels to reach the valve.
- Remove the solenoid coil from the valve body.
- Open the brass body carefully and keep track of the spring and plunger.
- Inspect the plunger and bore for scale debris, pits, and sticky residue.
- Clean the parts until the plunger moves freely in the tube.
- Check the discharge path to the drip tray for any plug or flake.
- Reassemble and test for a crisp click and a clean vent to the tray.
The test after reassembly is simple: the valve should click, and the brew path should release pressure instead of hanging up. If the machine still dead-heads the group or refuses to dump into the drip tray, the problem may be deeper than scale alone.
This is where a careful teardown matters, because the wrong part can be blamed even after the valve is already open. If the bore is clear and the plunger still binds, the valve body may be worn rather than dirty. If you need a broader repair overview, pair this step with what is actually stuck.
A lot of owners stop at the plunger and miss the exhaust side. That is a costly mistake. If the drip tray discharge tube is blocked, the valve can be spotless and still fail in use.
What mistakes make the clog come back?
The clog comes back when the valve is cleaned but the water source, drain path, or diagnosis stays the same. The most common mistake is cleaning only the visible brass body and leaving the discharge tube, group path, or water quality issue untouched.
Three mistakes show up over and over:
- Cleaning a dead coil: If the valve never clicks, the plunger is not moving. Acid will not fix a coil fault.
- Stopping at the first flush: A half-cleared bore can work for a day and then seize again when loose scale shifts.
- Ignoring the drain side: A blocked drip tray discharge tube can make a good valve look bad.
The cost of those mistakes is wasted time, extra wear on seals, and a false diagnosis. The machine may seem repaired for one brew cycle and then fail again under pressure. That leads people to blame the wrong part, which turns a small repair into a larger one.
The cleaner habit is to match the fix to the symptom. Click with no venting points to a mechanical blockage. No click points to the solenoid coil or its power feed. Weak, partial venting points to scale debris or a partially blocked exhaust route.
Water quality is part of the story too. If the machine is fed hard water, the same valve can clog again after a careful repair. That is why service literature and water standards from equipment makers and groups like the Specialty Coffee Association matter here. They explain the cause, even when the valve body is the part you are holding. For more on water-related repeat failures, see the SCA water standards.
When should I stop and get help?
Stop and get help when the valve does not click, the wiring looks damaged, or the body will not come apart without force. A three-way solenoid valve sits in a hot, wet, high-pressure path, and forcing it can crack fittings or damage seals.
That warning is not about fear; it is about avoiding a repair that turns into a leak. If the machine has already failed a multimeter check, the issue may be in the coil, switch, or control circuit rather than the valve body. If the valve still does not vent after a full cleaning and careful disassembly, the part may be too worn to save.
It also makes sense to stop when the machine is under warranty or when the service manual requires specific tools you do not have. A stripped brass fitting or a torn gasket can cost more than the original clog. A careful repair is the goal, not an aggressive one.
If the coil clicks and the bore is packed, clear it; if the coil stays silent, diagnose the electrical side first; if the valve still fails after both checks, replace or service the assembly rather than chasing the same clog forever. That is the practical route a home espresso troubleshooting guide should follow, and it fits the broader home espresso machine diagnostics hub. For warranty and service safety, consult the machine maker’s manual or a qualified technician.
How to tell if solenoid valve is stuck espresso?
A solenoid valve is probably stuck if the coil clicks but the group head does not vent to the drip tray when brewing stops. A silent coil points more toward an electrical problem, while a clicking coil with no pressure release points toward scale debris or a jammed plunger.
The click test is the fastest clue, but it is only a clue. If the valve clicks and the machine still does not vent, the next check is the discharge path and the bore. If you cannot confirm either one safely, a technician can test the valve under load and inspect the assembly without risking damage.
Can you clean a solenoid valve without removing it?
Yes, but only if the coil still clicks and the blockage seems light enough for a normal cleaning or descaling cycle to move through the valve. This is a limited fix, not a cure for a hard jam. If there is no change after a normal cycle, removal is the better next step.
A 1-cycle flush can help when mineral buildup is mild. It is less useful when the valve has a packed bore, a blocked exhaust line, or a dead coil. If the symptom stays the same after 1 normal cleaning pass, the problem is likely beyond in-place cleaning.
Why is water not coming out of espresso group head?
Water may not come out because the pump is not pushing, the solenoid coil is not actuating, or the three-way solenoid valve is blocked by scale debris. If the valve clicks and still does not release water or pressure, the problem is likely inside the valve body or the drip tray discharge path.
A quick way to sort that out is to separate electrical from mechanical failure. If there is no click, inspect the coil and wiring first. If there is a click but no venting, look at the bore, plunger, and discharge route next.
Drafted with AI; not yet reviewed by a person.




One thought on “How to Unclog a Stuck Three-Way Solenoid Valve on an Espresso Machine”