Last updated: November 20, 2026
How to Diagnose an Espresso Machine That Will Not Heat: Thermal Fuse vs Element vs Thermostat
Quick answer: in a machine that will not heat, the problem is usually one of 4 parts: the thermal fuse, the high-limit thermostat, the heating element, or the controller. This guide covers How to Diagnose an Espresso Machine That Will Not Heat: Thermal Fuse vs Element vs Thermostat by tracing the heating circuit from the input side forward. Before opening the case, speak to a qualified repair technician about your own situation if you are unsure around live mains wiring, a sealed boiler, or a machine with water leaks.
Key takeaways
- A cold boiler with a live power light usually points to a break in the heating path, not a brewing problem.
- A thermal fuse is a one-time safety part; an open reading usually means it has failed.
- A thermostat or high-limit switch can open and stop heat without the element being bad.
- A heating element can fail open, short to ground, or draw current badly enough to trip a safety part.
- A multimeter set for continuity or ohms is the main tool, but the part order matters.
What part of the heating circuit fails first?
The espresso machine heating circuit usually fails at one of four points: the thermal fuse, the high-limit thermostat, the heating element, or the control side that switches power to them. In a simple boiler setup, power flows from the mains input through a safety device, then through the thermostat or PID temperature controller, and finally to the heating element terminals.
That order matters because a dead boiler is not the same as a dead pump or a scale-clogged brew path. A machine can light up, click, and still never warm the boiler if one safety link is open. On many home machines, a PID temperature controller adds another layer, because it may be receiving power while the element never gets a switching signal.
A clean diagnosis starts with the simplest branch: is there continuity through the safety parts, and does the element itself still read like a load instead of an open circuit? That sequence saves time and keeps the test centered on the heating path instead of guessing at unrelated faults.
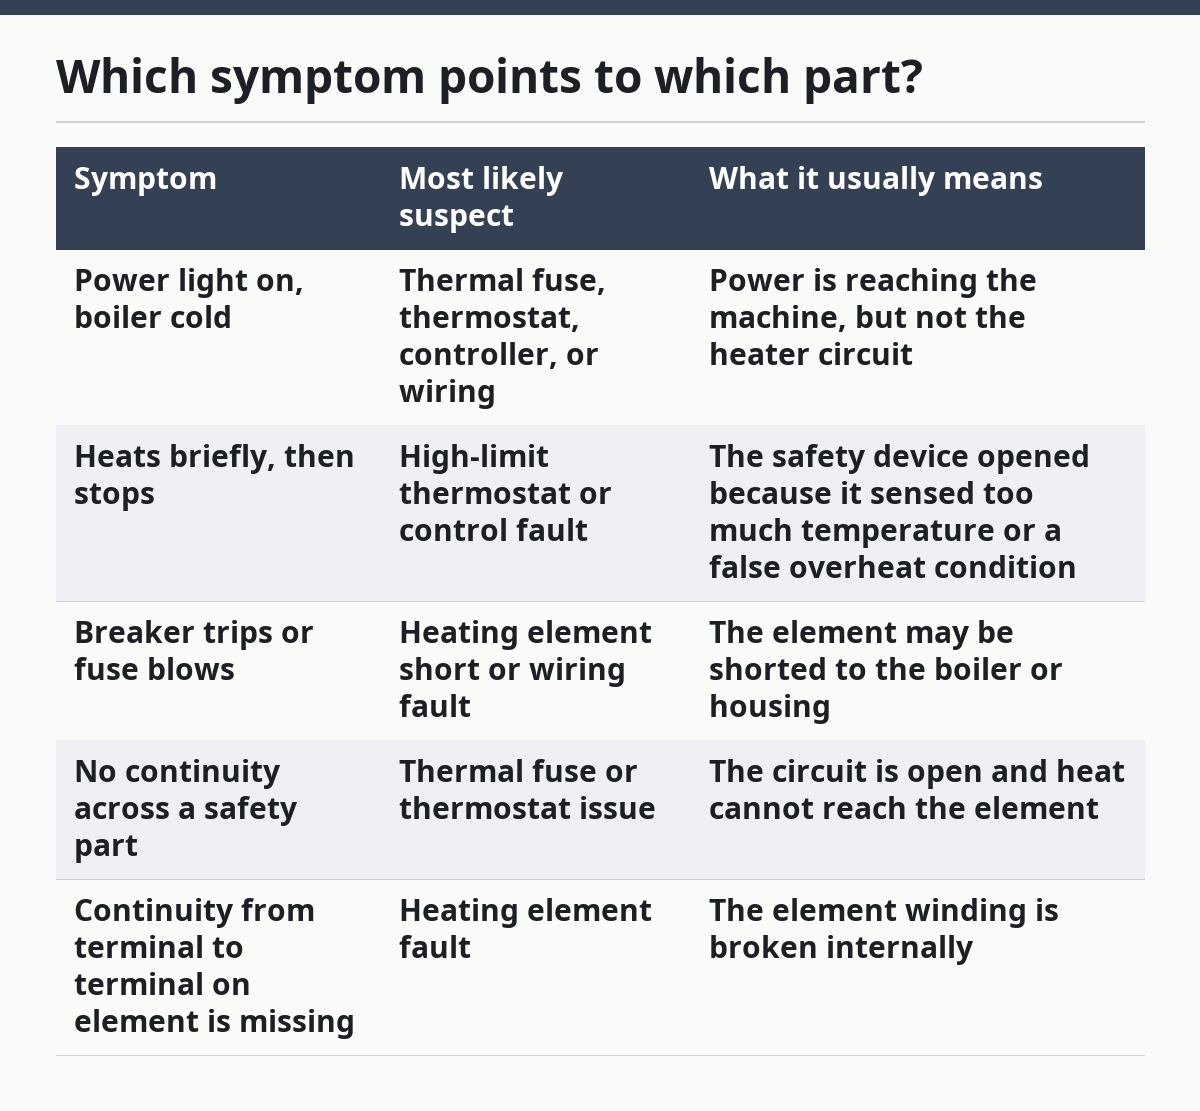
Which symptom points to which part?
A cold boiler with normal lights often points to a break somewhere between the power input and the element. A machine that heats a little, then quits, often points to a thermostat or high-limit device opening under heat. A machine that never warms at all can still have a good element if a thermal fuse or controller has opened first.
| Symptom | Most likely suspect | What it usually means |
|---|---|---|
| Power light on, boiler cold | Thermal fuse, thermostat, controller, or wiring | Power is reaching the machine, but not the heater circuit |
| Heats briefly, then stops | High-limit thermostat or control fault | The safety device opened because it sensed too much temperature or a false overheat condition |
| Breaker trips or fuse blows | Heating element short or wiring fault | The element may be shorted to the boiler or housing |
| No continuity across a safety part | Thermal fuse or thermostat issue | The circuit is open and heat cannot reach the element |
| Continuity from terminal to terminal on element is missing | Heating element fault | The element winding is broken internally |
A thermal fuse is a one-time safety link. A high-limit thermostat is usually a resettable temperature switch, while a PID temperature controller is an electronic box that reads a probe and switches the heater on and off. Those parts can look similar from the outside, but they do different jobs.
The wrong assumption is to blame the element first just because the boiler is cold. That can waste an hour and lead to an unnecessary part swap. The better question is simple: where, exactly, did the circuit open?
How do you test the heating circuit step by step?
The heating circuit is tested by tracing continuity from the power side through each safety part to the element, with the machine unplugged and cool. A multimeter set to continuity or low ohms is the main tool, and the goal is to find the first open point, not to replace parts by guesswork.
- Unplug the machine and let the boiler cool completely. Verify that the power cord is out of the outlet and the case is cool to the touch. If any cover has to come off near 120V or 230V wiring, a live test is not the right place to start.
- Open the case enough to reach the heating circuit without disturbing the boiler. Verify that you can see the element terminals, the thermal fuse, and any thermostat or PID leads. If the boiler must be removed just to see the wiring, stop there and use the wiring diagram instead of forcing it.
- Label each wire before pulling a connector. Verify wire positions with a phone photo and simple tags, especially on 2-terminal elements and 2-wire thermostats. If the machine has a PID, mark the sensor leads separately from the heater leads so they do not get swapped.
- Test the thermal fuse for continuity across its two ends. Verify that the meter shows near 0 ohms or a continuity beep. If it reads open or infinite resistance, the fuse has failed and the circuit stops there.
- Test the high-limit thermostat or thermostat contacts at room temperature. Verify that the switch state matches the part type: many safety thermostats should show continuity when cool, while an open reading means the contact is not closed. If the reading flips only when you press, tilt, or flex the body, the part or its terminals may be unreliable.
- Test the heating element across its two terminals. Verify that the element is not open and that resistance is present between the terminals. If the meter shows open circuit, the element winding is broken; if the reading is oddly unstable, the terminal or connector may be damaged.
- Check each element terminal to the boiler body or ground. Verify that there is no continuity from either terminal to metal ground. If the meter beeps to the boiler, the element may be shorted to ground, which is a different fault from an open element.
- Trace power forward from the input side to the controller side. Verify continuity through each wire segment, switch, and connector in order. If every part tests good but the boiler still never heats, the control side may not be sending power under load, especially on a machine with a PID temperature controller.
The point of this sequence is to stop at the first failed link. A good heater at the end of a bad chain still gets no power. A bad heater can also look fine until it is checked against the boiler body, not just across its own terminals.
How does the espresso machine heating circuit work?
The espresso machine heating circuit works by sending mains power through one or more safety parts, then into the heating element inside the boiler. The thermostat or PID controller decides when heat is needed, while the thermal fuse and high-limit thermostat act as safety cutoffs if the boiler runs too hot.
That is why the boiler can stay cold even when lights and switches appear normal. The control side can be alive, but one open safety device still breaks the path. On a basic boiler machine, the diagnosis is more direct. On a PID-equipped model, the controller, probe, relay, and wiring add a second layer of possible failure.
A boiler is the metal vessel that holds the water being heated. The heating element is the resistive part that turns electrical energy into heat. If the element is intact but the safety parts are open, the water never rises in temperature because the circuit is incomplete. The Maillard reaction may belong in a kitchen, but here the important chemistry is simple electrical resistance and heat transfer.
When should you stop and hand this off?
Stop this approach when the fault is not a simple continuity problem, because the next step can involve live power, hidden corrosion, or a sealed boiler. On a household appliance, the wrong move can turn a small repair into a bigger electrical or leak issue.
There is water around the base or inside the case: Moisture can create a shock risk and can also hide the real fault — dry the machine fully and have the leak source checked before electrical testing.
The thermal fuse is open and the part is buried in insulation or heat tubing: The fuse did its job, but the cause is still unknown — do not bridge it; the overheating source needs proper investigation.
The element shows continuity to the boiler body: That points to a ground fault — stop using the machine and have the heater assembly checked or replaced.
The wiring insulation is brittle, melted, or discolored: Heat damage often spreads beyond one part — the harness and terminals need inspection, not just a new fuse.
The machine has a PID and the heater still never switches on after good continuity tests: The fault may be in the relay, probe circuit, or controller logic — this is no longer a simple fuse-or-element check.
You cannot identify the terminals with the wiring diagram: Guessing can misplace power leads and damage the control board — pause until the correct diagram or a qualified repair person is available.
These are the points where a do-it-yourself test may stop being the best tool. The issue is no longer just “which part is open?” but “why did it open, and what else was affected?”
What mistakes cause bad readings?
Bad readings usually come from testing the wrong point, testing with power still connected, or treating every thermostat like the same part; if you are unsure, consult a qualified repair technician before continuing. The result can be a false blame on the heating element when the real fault is a fuse, a switch, or a wiring break. According to OSHA, live electrical work requires strict hazard control, and unplugging the appliance before resistance testing is the safer first step. OSHA electrical safety guidance
One common error is checking the element only across its own terminals and ignoring ground. That misses a short to the boiler body, which can trip protection or blow a fuse. The correct check is terminal to terminal and then each terminal to the boiler frame.
Another mistake is assuming a thermostat must read open or closed the same way in every machine. Some are safety switches, some are operating thermostats, and a PID controller is neither. If the part type is not known, the meter reading can be misunderstood in seconds. For a wiring reference, compare the machine diagram with espresso machine troubleshooting notes before moving leads.
A third error is pulling connectors without labeling them. On a 3-wire junction or a controller board, one swapped lead can confuse the whole circuit and create a new fault. A phone photo takes less than a minute and can save a lot of backtracking. For related layout details, see espresso machine leaks and descale espresso machine.
The fourth mistake is replacing the thermal fuse without asking why it opened. That part is not a resettable switch. If the boiler overheated because of scale, a stuck relay, or poor thermal contact, the new fuse can fail again. For heating-path checks, espresso machine brewing pressure is not the issue; the heater circuit is.
What changes with PID machines or different boilers?
PID machines change the diagnosis because the controller, probe, and relay become part of the heating path. A standard thermostat can fail in a more mechanical way, while a PID system can leave the element and fuse looking fine but still never send heat.
On a machine with a PID temperature controller, the heating element may have good continuity and the thermal fuse may be intact, yet the relay never closes. That shifts the next check to the control side, not the boiler body. The same idea applies to different boiler designs: some are simple, some use a separate steam boiler, and some route power through extra connectors or limit switches.
The practical rule is this: the more control parts between the mains input and the element, the more careful the trace has to be. The first open link still matters most, but the path may include more than one thermostat-style device.
FAQ
How to test an espresso machine heating element with a multimeter?
The heater is tested by checking resistance across its two terminals and then checking each terminal to the boiler body. A reading across the terminals shows whether the winding is intact, while a reading to ground checks for a short to the metal case. If either test is open or abnormal, the element or its insulation is likely faulty.
Can a tripped thermal fuse be reset on an espresso machine?
No, a thermal fuse is generally a one-time safety part and is not designed to be reset. If it reads open, the circuit is broken and the machine will not heat through that path. The cause of the overheating still needs attention before any replacement is put in place. IEC safety standards overview
Why does my espresso machine turn on but not heat up?
That usually means power is reaching the machine but not the boiler circuit. The most common breaks are a thermal fuse, a high-limit thermostat, a heating element, or a controller that is not switching the heater on. A continuity check from the input side forward is a practical way to find the first open link.
Drafted with AI; not yet reviewed by a person.